 admin
admin SFM Compile: A Professional Guide to Custom Model Integration for Source Filmmaker

You have built a great model, exported it, and loaded it into Source Filmmaker (SFM), only to be greeted by a purple-and-black checkerboard. Nearly every animator hits this wall at some point. The good news is that the fix is rarely mysterious. It almost always comes down to a disciplined compile routine.
This guide walks you through the full process of compiling models for SFM: how the Source engine pipeline works, how to configure Crowbar, how to write a QC file, how to prepare textures, and how to resolve the errors that consume so many evenings.
1. Understanding the Source Engine Workflow
An SFM compile converts your exported model files into compiled assets that Source Filmmaker can read. SFM runs on a version of the Source engine, which cannot open a raw Blender or Maya scene. It requires a Source model in the .mdl format. As a common Steam Community answer puts it, you export SMD or DMX files, not MDL, and a compile produces the final result.
A useful analogy is baking bread. Your SMD or DMX files are the raw dough, the QC file is the recipe, and StudioMDL is the oven. Every compile therefore has three ingredients: source files, a QC script, and the compiler. Textures follow a parallel track: image, then VTF, then VMT, then material.
A successful compile produces the following files:
| File | What it stores |
|---|---|
| .mdl | Bones, sequences, and material links |
| .vvd | Vertex data |
| .dx90.vtx | Mesh rendering strips |
| .phy | Collision data |
| .ani | Animation data stored separately |
2. The Role of Crowbar in the Compilation Pipeline
Crowbar is a free graphical tool that sits in front of StudioMDL, sparing you from typing command-line instructions. On the Compile tab, you select Source Filmmaker as the game, browse to your QC file, and click Compile. Crowbar can also decompile existing models, which is an excellent way to study how experienced creators build theirs.
Configuring Crowbar
- Open the Set Up Games tab.
- Point Crowbar to your SFM game folder.
- Point it to the correct studiomdl.exe (your compiler path).
- Confirm that the game paths match.
Choosing the correct StudioMDL matters more than any other setup step. A compiler from the wrong Source game can produce files that look fine but fail inside SFM.
Reading compile logs. Always locate the first genuine error and address it. The messages beneath it are usually just noise caused by that initial failure.
3. Preparing Your Files for Export
Good 3D modeling habits save hours. Before leaving Blender, Maya, or 3ds Max:
- Apply scale and transforms.
- Fix your UV layout so textures do not stretch.
- Name bones clearly.
- Give every material a short, simple name.
- Delete stray geometry.
- Confirm the mesh is bound to the correct skeleton.
A messy scene produces messy compile errors.
Exporting. With Blender Source Tools, choose your reference mesh and export it as SMD, then repeat for each animation. Choose DMX when you need flexes, since it stores shape data well.
Organizing your project. Keep everything in a clean folder structure, using lowercase names without spaces:
| Folder | Purpose |
|---|---|
| source | Blender or Maya scenes |
| export | SMD and DMX files |
| qc | QC scripts |
| textures | PNG, TGA, VTF, VMT |
| compiled | Finished test output |
4. Writing the QC File: The Blueprint of Your Model

A QC file is a plain-text script that tells StudioMDL how to build the model. It names the model, lists meshes, points to materials, and defines animations. To create one, open a text editor, save the file with a .qc extension, and store it beside your SMD files.
Common commands include $modelname, $body, $cdmaterials, $sequence, $collisionmodel, $hbox, and $surfaceprop.
A minimal example:
$modelname "mycharacter/mycharacter.mdl"
$body "Body" "body.smd"
$cdmaterials "models/mycharacter/"
$surfaceprop "flesh"
$sequence "idle" "idle.smd" loop fps 30
Important: use straight quotes only. Curly quotes will break the parser. Props often add $staticprop.
Build a reusable template. Save one working QC as your gold copy and change only the names and paths for each new project. When a line fails, fix that line first and leave everything else untouched.
5. Creating and Converting Textures to VTF
A VMT (Valve Material Type) file is a small text file that tells the engine how to draw a surface. The image itself lives in a VTF (Valve Texture Format) file.
Workflow
- Paint your texture as PNG or TGA.
- Open it in VTFEdit and save it as VTF.
- Write a matching VMT.
A basic VMT looks like this:
"VertexLitGeneric"
{
    "$basetexture" "models/mycharacter/body"
}
Note that there is no .vtf extension in the path. The $cdmaterials line in your QC points to the folder, and the VMT points to the image. A prop may need only a diffuse map, while a character often adds a normal map, a specular or phong mask, and sometimes ambient occlusion. Use transparency only when necessary, and make sure your UVs match the artwork.
6. Troubleshooting Common SFM Compilation Errors
The golden rule: read the first meaningful message, check the QC line it names, verify the filename and folder, confirm the compiler branch, and recompile. Only then look at warnings.
Keep two kinds of problems separate. A compiler error stops StudioMDL. A loading problem appears after a clean compile.
| Symptom | Likely cause | Fix |
|---|---|---|
| Cannot open SMD | Wrong path or name | Match the QC to the file |
| Unknown command | Wrong compiler branch | Check the game setting |
| Checkerboard surface | Material path error | Fix the VMT or $cdmaterials |
| Model not listed | Wrong folder | Check the output location |
Purple and Black Textures
This means the engine cannot find the material. Check the VMT first, then confirm the VTF sits beside it, and finally verify that the $cdmaterials path matches the real folder exactly. A recompile is rarely needed for this issue.
StudioMDL Not Found
This is a compiler path problem. Open the game setup and point Crowbar to the correct studiomdl.exe inside the Source SDK or SFM tools folder. Recheck the game selection as well.
Model Compiles but Does Not Animate
This usually traces back to animation data. Compare the bone hierarchy in your mesh and animation files, since the names must match exactly, and inspect each $sequence line. A clean compile only proves the syntax is valid, not that the skeleton works.
Other Common Errors
- Invalid bone weights: Source allows only a few weights per vertex, commonly three. Limit and normalize weights in Blender.
- Vertex limit errors: Split heavy meshes into separate parts.
- Bone limit errors: Remove unnecessary bones. The cap varies by branch, so check your compile log.
- Unknown QC commands: Usually a sign of the wrong compiler branch.
7. Integrating Models into the SFM Directory
Most creators use the usermod folder inside the SFM game directory as a custom content folder. Models go in a models folder, while VMT and VTF files go in the matching materials folder. This lets you add custom content without touching Valve’s originals. Advanced users can also create a custom mod folder by adding a search path to the gameinfo file.
| Content | Location |
|---|---|
| .mdl, .vvd, .vtx, .phy | usermod/models/yourfolder |
| .vmt, .vtf | usermod/materials/models/yourfolder |
If the model does not appear:
- Confirm the compiled files exist in your SFM directory.
- Check that folder names match your QC and VMT.
- Restart SFM.
- Open the model browser and search again.
Do not recompile yet. Most misses are folder mistakes, not compile mistakes.
8. Skeletal Rigging and Physics
Start with a clean rigging plan: a logical bone hierarchy, clear bone names, and well-painted vertex weights. Poor weights cause collapsed shoulders and stretched arms, and recompiling will not fix them.
Many creators use ValveBiped bones because they match Valve’s standard rigs. Copy the naming and structure so animations transfer. Add attachments for hats or weapons and define hitboxes with $hbox.
Physics is a separate concern. Build a simple physics mesh and reference it with $collisionmodel; the compile will produce a PHY file. Ragdolls need additional joint data. Keep collision shapes low in detail, because a detailed render mesh makes a poor physics mesh. Cinematic characters can often skip physics at first, while interactive props need it.
9. Advanced Techniques: Flexes and Facial Animation
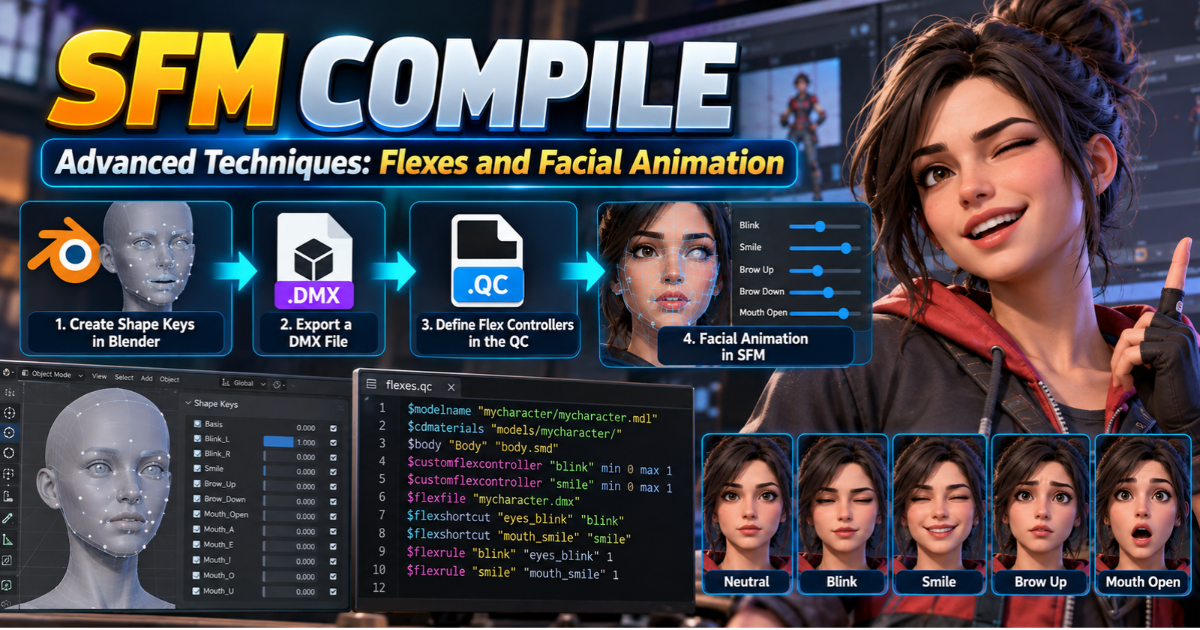
Create shape keys in Blender, export a DMX file, then define flex controllers and rules in the QC that link them to those shapes. These sliders drive blinks, smiles, brows, and lip-syncing through phoneme shapes.
Tips for a painless setup
- Start with just two expressions, compile, and test in SFM before adding more.
- Avoid hyphens and unusual symbols in controller names, since the parser may read them as math.
- Keep names identical between your source file and the QC.
A staged approach makes faulty flexes easy to spot. Patience beats speed here.
10. Testing and Final Polish
- Load the model in the Half-Life Model Viewer to check bones, hitboxes, and materials quickly.
- Open it in SFM and check scale and textures.
- Pose the arms, legs, spine, and neck.
- Test facial flexes.
- Test sequences last.
A short case study. Sam builds a robot prop and compiles only once, at the very end, producing three errors at the same time. On the next project, Sam compiles after each stage: mesh, then materials, then bones. Each error appears alone and takes minutes to fix. Small cycles beat one giant leap.
Keep compile logs and backups so that when version 13 breaks, version 12 can save you. Light optimization, such as removing unseen faces, also helps.
11. Refining Your Workflow
A strong SFM workflow feels boring in the best way:
- Use consistent names everywhere.
- Reuse QC templates.
- Keep your source project separate from compiled output to prevent accidental overwrites.
- Record your Blender Source Tools settings, compiler path, and material folders.
- Test with a simple prop before attempting a full character.
Over time your asset library becomes tidy and reliable, and you spend less time hunting bugs and more time animating.
Frequently Asked Questions
What is an SFM compile?
It turns exported model files and a QC script into compiled files that Source Filmmaker can load. It is the bridge between your 3D software and your scene.
Can I use Crowbar to compile models for Source Filmmaker?
Yes. Open the Compile tab, choose Source Filmmaker as the game, select your QC file, and click Compile. Crowbar runs StudioMDL and displays the log. Confirm your game paths first.
Why does my SFM model have purple and black textures?
The material path is broken. Check the VMT, then the VTF location, then the $cdmaterials line.
Why does my custom character compile but not animate?
The skeleton, bone hierarchy, weights, or $sequence lines are likely incorrect. Bone names must match across mesh and animation files.
Why does Crowbar say StudioMDL cannot be found?
The compiler path is wrong or the game tools are missing. Reopen the game setup and point to the correct studiomdl.exe.
Conclusion
An SFM compile follows one clear path: prepare the model, export SMD or DMX files, write a clean QC, build VTF and VMT materials, compile with the right StudioMDL through Crowbar, install the files, and test. Every file must agree with the next, and when they do, your custom models simply work.
Start small by compiling a simple prop today, then progress to rigged characters and facial animation. Have a stubborn error? Share it in the comments; someone has likely solved it before.